Code, Resources, Tips
MAMP Pro is great. It does a number things well which helps streamline the development process. The primary reasons I use MAMP Pro is that I can pull my sites from git into my local MAMP server, import the database quickly (including large SQL files), and it renders right in my browser right away at http://dev-projectname:8888 with very little setup. I will show you how to edit some configuration settings to get you setup and working quickly.
Setup your Dev environment:
- Using your Finder go to /Applications/MAMP/htdocs/ and create your Document Root folder for your project. Import your project files into this folder. Note: this htdocs folder is located at c:\MAMP\htdocs\ on the Windows version.
- Using MAMP Pro click the Hosts tab in MAMP Pro and click the + button on the bottom left.
- Add your development project details. I generally go with dev-projectname as the Server Name. This is what you will load in your browser to see your website some servers set this to localhost but I find dev-projectname is more useful for my purposes. The only other option you edit under Hosts is the Document Root which you set to the folder you created in Step 1.
- Click the Start icon in the top right and this gets your server running.
- Your website will now load in http://dev-projectname:8888.
The reason you want to use MAMP Pro is so you can develop your sites using http://dev-projectname:8888 rather than http://localhost/projectname:8888 which is a subdirectory and you run into issues with absolute URL paths. Just upgrade and use the Hosts feature. It’s so worth it.
Create/Import your Database:
- Click the MySQL tab and click phpMyAdmin to open that in your browser.
- Click the New link on the top left above the database list.
- Name your database dev_projectname. You can name the database whatever you like but to keep it organized I name it the same as the Server Name I created in the first set of instructions. Note that I use an underscore for the database name and a hyphen for the project URL.
- Now you can import your database.
- Edit your website configuration files to connect to this local database.
Importing large .sql files using phpMyAdmin:
If you are seeing this error “You probably tried to upload too large file. Please refer to documentation for ways to workaround this limit.” You need to edit your configuration files inside MAMP to import a database larger than 32MB.
- Go to the PHP tab in MAMP Pro. Make note of the PHP version you are using. I set my version to 5.6.x to match the version running on my Production Web Server.
- Go to File > Edit Template > PHP > select the version of PHP your server is running. Edit the following settings and save:
- post_max_size = 256M
- upload_max_filesize = 256M
- max_execution_time = 600
- max_input_time = 600
- memory_limit = 512M
- Restart your server and you should now be able to upload up to 256MB to your database.
Now that everything is running you should be able to quickly pull your sites from Github into your MAMP server; export your large database from Production and import it right into your local Dev; and have it all render at http://dev-projectname:8888 quickly. Make your edits and push your changes right onto QA and Production like a champ.
WordPress
There are a number of options for adding tables to your WordPress website. The plugin I prefer is Easy Table because it is simple to setup and very functional.
Easy Table
Easy Table is WordPress plugin to create table in post, page, or widget in easy way using CSV format.
https://wordpress.org/plugins/easy-table/
Settings
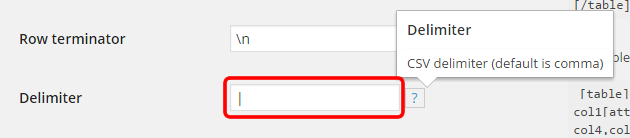
Before getting started the only setting I change is switching the delimiter from a comma (,) to a pipe (|) since commas are used to display some data. It prevents you from accidently running into formatting errors as demonstrated in my example below which has a list of cities using a comma before the state.
Usage
Here is a sample table using this plugin. The first row will be the table headers which is a setting inside the plug options which can be disabled.
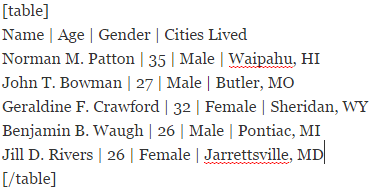
Rendered Table
[table]
Name | Age | Gender | Cities Lived
Norman M. Patton | 35 | Male | Waipahu, HI
John T. Bowman | 27 | Male | Butler, MO
Geraldine F. Crawford | 32 | Female | Sheridan, WY
Benjamin B. Waugh | 26 | Male | Pontiac, MI
Jill D. Rivers | 26 | Female | Jarrettsville, MD
[/table]
Code
Twitter Bootstrap is great but their carousels always bugged me. They don’t work well with images that are not the exact same size and clients uploading their own graphics you end up with a slider that resizes depending on the current image that is loaded.
My solution (using Bootstrap 3):
- Replace the image with a container div using the image file as a background.
- Set width to 100% so it will expand to fill it’s container. Set the height of the slider so it will have a consistent display regardless of the image size.
- Win
Here is the sample page comparing the two:
https://parkhurstdesign.com/sites/bootstrapsandbox/slider-fixed.php
Sample Code from the Twitter Bootstrap website:
<div id="carousel-example" class="carousel slide" data-ride="carousel">
  <!-- Indicators -->
  <ol class="carousel-indicators">
    <li data-target="#carousel-example" data-slide-to="0" class="active"></li>
    <li data-target="#carousel-example" data-slide-to="1"></li>
    <li data-target="#carousel-example" data-slide-to="2"></li>
  </ol>

  <!-- Wrapper for slides -->
  <div class="carousel-inner">
    <div class="item active">
      <img src="..." alt="...">
      <div class="carousel-caption">
        ...
      </div>
    </div>
    ...
  </div>

  <!-- Controls -->
  <a class="left carousel-control" href="#carousel-example" data-slide="prev">
    <span class="glyphicon glyphicon-chevron-left"></span>
  </a>
  <a class="right carousel-control" href="#carousel-example" data-slide="next">
    <span class="glyphicon glyphicon-chevron-right"></span>
  </a>
</div>
The only change is the “item” divs. I am using this in a CMS so I use inline styles for the background divs so I can set the background image files within the loop. Just easier for my purposes. Change the img tag to a div as follows:
<div class="item active">
  <img src="/path/image.jpg" alt="blah">
  <div style="background:url(/path/image.jpg) center center;
          background-size:cover;" class="slider-size">
    <div class="carousel-caption">
      <h2>Headline</h2>
      <p>Content text to go here. </p>
    </div>
  </div>
</div>
The CSS:
.slider-size {
height: 400px; /* This is your slider height */
}
.carousel {
width:100%;
margin:0 auto; /* center your carousel if other than 100% */
}
One more thing. The damn sample script navigation doesn’t work on the Bootstrap website for some CMS themes. Code changes in bold. Here is how you fix it:
<!-- Controls -->
<a class="left carousel-control" href="javascript:void(0)"
     data-slide="prev" data-target="#carousel-example">
<span class="glyphicon glyphicon-chevron-left"></span>
</a>
<a class="right carousel-control" href="javascript:void(0)"
     data-slide="next" data-target="#carousel-example">
<span class="glyphicon glyphicon-chevron-right"></span>
</a>
Accessibility concerns: with an img tag you include alt text for accessibility. Divs unfortunately do not allow you this option. It is a trade-off but you do include caption text within the div which helps but I am sure it is weighted differently.
Code
There are a number of ways to find the difference between two time stamps in PHP. I needed to find the number of hours for a project with a time clock. Here is an example you can test using the DateTime class.
		$date1 = new DateTime('2004-03-01T01:30:00');
		$date2 = new DateTime('2004-03-02T02:30:00');

		$diff = $date2->diff($date1);

		$hours = $diff->h;
		$hours = $hours + ($diff->format('%d')*24);
		$hours = $hours + ($diff->format('%i')/60);

                // output our result with 2 decimal places
		printf('Hours: %s',number_format($hours,2));
You can edit the date values to test the result. It will also take into account leap years if you want to be assured of the results.
Code, Drupal, Theming
I use Twitter Bootstrap as a base theme for most of my sites in Drupal. There are a ton of build in features that make theming a quick and enjoyable process. One thing that bugs me is the default padding and margin settings. They are a headache to deal with so here is a CSS reset to remove some of the more annoying settings.
Place this at the start of your custom CSS file and set your own padding/margins!
html,body {
  height: 100%; margin: 0px; padding: 0px; }

#navbar {
  margin-bottom:0; }

.alert {
  border-radius: 0; }

.container {
  width:100%;
  padding-right: 0;
  padding-left: 0;
  margin-right: auto;
  margin-left: auto; }

.col-xs-1, .col-sm-1, .col-md-1, .col-sm-1,
.col-xs-2, .col-sm-2, .col-md-2, .col-sm-2,
.col-xs-3, .col-sm-3, .col-md-3, .col-sm-3,
.col-xs-4, .col-sm-4, .col-md-4, .col-sm-4,
.col-xs-5, .col-sm-5, .col-md-5, .col-sm-5,
.col-xs-6, .col-sm-6, .col-md-6, .col-sm-6,
.col-xs-7, .col-sm-7, .col-md-7, .col-sm-7,
.col-xs-8, .col-sm-8, .col-md-8, .col-sm-8,
.col-xs-9, .col-sm-9, .col-md-9, .col-sm-9,
.col-xs-10, .col-sm-10, .col-md-10, .col-sm-10,
.col-xs-11, .col-sm-11, .col-md-11, .col-sm-11,
.col-xs-12, .col-sm-12, .col-md-12, .col-sm-12 {
  position: relative;
  height:100%;
  min-height: 1px;
  padding-right: 0;
  padding-left: 0; }

.row {
  margin-right: 0;
  margin-left: 0; }

.footer {
  margin-top: 0;
  padding-top: 0;
  padding-bottom: 0;
  border-top: none; }

.panel {
  border:none; }
Code
Probably a silly mistake that I had to deal with… but if your clients upload image files with spaces in the file name you will end up with broken image links. When returning filenames or paths from the database you want to replace spaces with the HTML entities. But using urlencode() or htmlentities() will not work for this purpose.
Instead use:
rawurlencode()
Drupal, Projects
Empower your clients by simplifying the Drupal Backend. Create an admin experience simpler and sleeker than even WordPress.
This is my session topic at Drupal Camp Phoenix.
Drupal, Projects
Presenting today at Drupal Camp Phoenix! They put me right after the co-founder of Pantheon who was the keynote speaker at Drupal Camp 2013. This will either go very well or end badly….
The most important person you work with is the client yet many companies turn over terrible instructions or confusing administration interfaces. I give tips and explain how to build an amazing client admin panel.

Drupal, Projects
Technology: Drupal
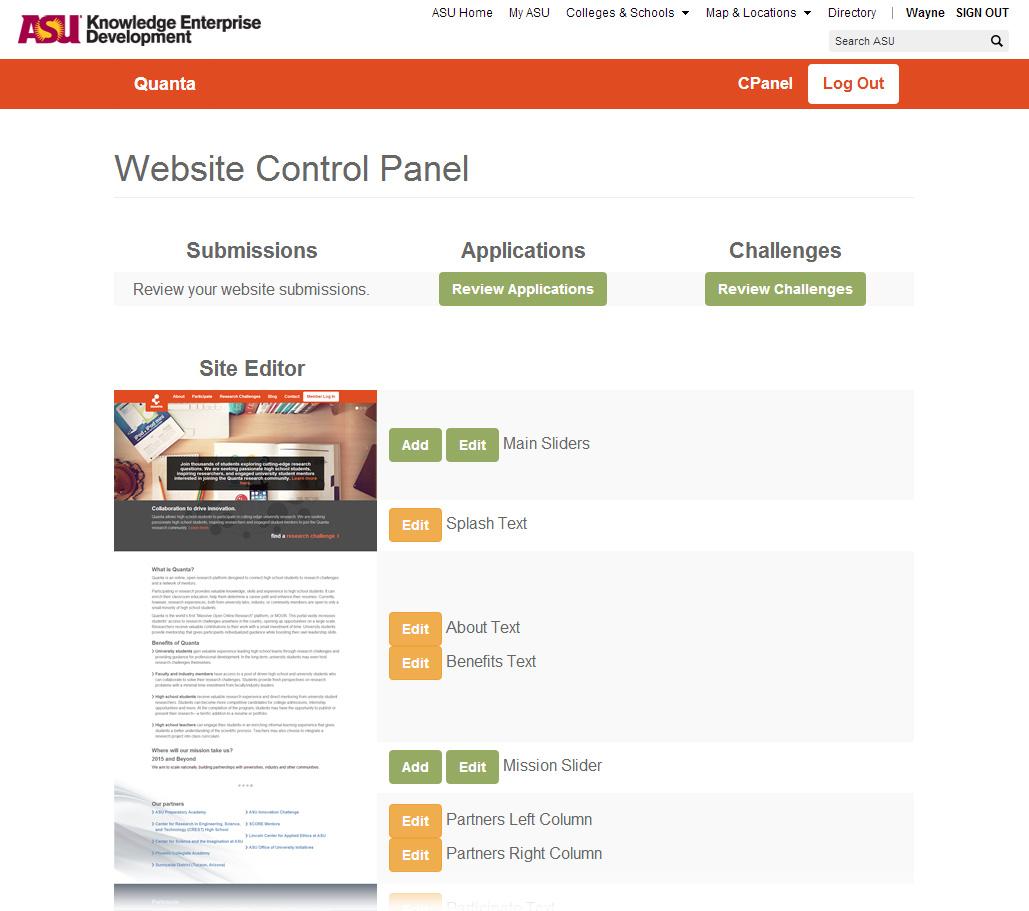
Quanta is an online, open research platform designed to connect high school students to research challenges and a network of mentors.
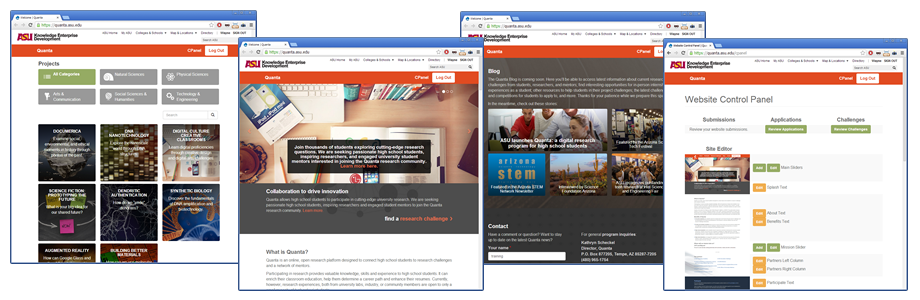
https://quanta.asu.edu/
Code
Use this to offset anchor links. Reasons for this might include using a fixed navigation bar that will cover part of the section you are loading.
Add a class to your anchor.
‹a class="anchor" id="top"›‹/a›
Now apply the offset script.
a.anchor {
  display: block;
  position: relative;
  top: -90px;
  visibility: hidden; }